My rating for this recipe: ✭✭✭✭✭+
Steve's rating for this recipe: ✭✭✭✭✭+
Admission - this is not a new recipe we tried this week. Reason - our little love has been sick and it's been too crazy to get to the store or worry about time-consuming new recipes. But I didn't want to have another week go by with no blog post since I'm doing my best to stay nearly on top of weekly posts...so I decided to post about the dish we had last night which we've made at least 20 times already, but is always our favorite thing we make. I didn't even ask Steve for his rating because I know if either of us could give this one more than 5 stars we would. I like to keep to the system, but a full 5 with a plus sign does not nearly do this one justice. This veganized Chicken Picatta is wonderfully delicious and packed with savory flavor. We just ate it last night and my mouth is watering for it again, just thinking about it now. This remains hands down the favorite of any dish we've ever tried. SO DELIGHTFULLY YUMMY!!! Ok, here it is...
What you need:
-1 package gardein chick'n scallopini
-sea salt and freshly ground black pepper
-1 cups unbleached flour
-4 tbsp earth balance soy butter
-3 TBSP extra virgin olive oil
-⅓ cup fresh lemon juice
-½ cup vegetable stock
-½ cup dry white wine
-¼ cup capers (we usually omit this)
-½ teaspoon chopped garlic
-½ teaspoon chopped shallots
-⅓ fresh parsley chopped (we usually omit this)
What you do:
- season the gardein scallopini with salt and pepper.
- dredge scallopini in flour and shake off excess- in a large 12 inch sauté pan over medium high heat, melt 1½ tablespoons of soy butter with 1½ tablespoons of extra virgin olive oil.
- when soy butter and oil start to sizzle, add the scallopini and cook for 3 minutes.
- when scallopini is browned, flip and cook the other side for 3 minutes.
- remove and transfer to plate.
- reduce heat to medium-low and add the white wine, lemon juice, stock, garlic, shallots and capers.
- return to stove and bring to a boil, scraping up brown bits from the pan for extra flavor.
- check seasoning - if too bitter, add a pinch of sugar. (we do this every time)
- return scallopini to the pan and simmer for 3-5 minutes.
- remove scallopini from the pan to a platter.
- add remaining 3 tablespoons of soy butter to the pan and whisk vigorously.
- pour sauce over scallopini and garnish with fresh chopped parsley.
source: gardein products
Wednesday, October 24, 2012
Wednesday, October 17, 2012
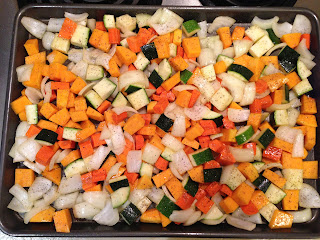
Moroccan Couscous
My rating for this recipe: ✭✭✭✭✭
Steve's rating for this recipe: ✭✭✭✭✭
Please, please, please try this recipe. I know not many, if any (besides Steve!) read this blog, but to anyone out there who does - if you've been considering trying out one of my posts, this is the one. I'll admit, this recipe is not exactly new - I've made it several times before, but I haven't blogged about it and this was the first time Steve tried it. And it's just so incredibly delicious, I had to post it. I've shared this recipe several times with friends, and now I'm adding it here. Every time I make it, it gets better. Mmmmm! I made this for dinner last night, had leftovers tonight, and am even considering stealing the other container I'd allocated for Steve's lunch tomorrow. Too bad he reads this blog and my plan is foiled. Damnit! Yes, it is seriously that good. Ok I'll stop obsessing and just tell you how you can be as delighted as we...
What you need:
2 cups peeled butternut squash, cut into ¼ to ½-inch cubes
2 cups yellow onion, large dice
1 ½ cups carrots, cut into ¼ to ½-inch cubes
1 ½ cups zucchini, cut into ¾-inch cubes
2 tablespoons extra-virgin olive oil
Fine sea salt
1 ½ teaspoons freshly ground black pepper
1 ½ cups vegetable broth
2 tablespoons Earth Balance butter
¼ teaspoon ground cumin (I used ⅛ this time bc I'm not crazy about cumin)
½ teaspoon saffron threads (I don't keep this in stock and have never missed it)
1 ½ cups whole wheat couscous (I don't use plain, not whole wheat)
2 scallions, white and green parts, chopped
What you do:
Preheat the oven to 375 degrees F.
Place the squash, onion, carrots, and zucchini on a baking sheet and toss with the olive oil, 1 teaspoon salt, and 1 teaspoon pepper.
Roast for 25 to 30 minutes, turning once with a spatula about midway through.
While the vegetables roast, bring the vegetable broth to a boil in a saucepan.
Remove the pan from the heat, and stir in the butter, remaining 1/2 teaspoon pepper, cumin, saffron, and salt to taste.
Cover the pan and steep for 15 minutes.
Scrape the roasted vegetables and their juices into a large bowl, and add the couscous.
Bring the vegetable broth back to a boil, and pour over the couscous mixture all at once.
Cover tightly with a plate and allow to stand for 15 minutes.
Add the scallions, toss the couscous and vegetables with a fork, and serve.


Source: The Kind Diet, Alicia Silverstone
Tuesday, October 09, 2012
The BEST Veggie Chili in the WORLD (well...almost!)
My rating for this recipe: ✭✭✭✭✩
Steve's rating for this recipe: ✭✭✭✭✭
Ohhhhh yeah, this was a good one! In fact, I would've given it a full 5 out of 5 myself, but I've actually tasted the best veggie chili in the world (Wild By Nature!), and I couldn't help but compare this to it. This was however, phenomenal. As Steve said, it's impressive when you taste vegetarian chili and it ACTUALLY tastes just like regular chili! And I felt crazy using these portions, since it said the recipe serves 8, but I'm so glad I didn't cut everything in half like I'd considered - I can't wait to have leftovers!! If you like chili, you will LOVE this recipe; I guarantee it. Even to the meat-eaters out there! In fact, this tastes more like actual chili than my favorite over at Wild By Nature...that one is just more palate-appealing in my personal opinion. But this one, ohhhhhhh this is definitely second best, and closer to the old familiar taste of what I used to very much enjoy in my (yucky) meaty days. Hooray for a delicious vegetarian chili - here's your ticket to a happy belly:
What you need:
-1 TBSP olive oil
-1/2 medium onion, chopped
-2 bay leaves (mine were old and yucky so I sub'd w 1 TBSP thyme)
-1 TSP ground cumin
-2 TBSP dried oregano
-1 TBSP salt
-2 celery stalks, chopped
-2 green bell peppers, chopped (I used red b/c I don't like green!)
-2 jalepeno peppers, chopped
-3 cloves garlic, chopped
-2 (4 oz) cans chopped green chile peppers, drained (I used one)
-2 packages veggie beef crumbles (I only had one so I also added 1 cup TVP...this gave it an awesome texture!!!)
-3 (28 oz) cans whole peeled tomatoes, diced
-¼ cup chili powder (I only used 2 TBSP and it still has quite a nice kick!)
-1 TBSP ground black pepper
-1 (15 oz) can kidney beans, drained
-1 (15 oz) can garbanzo beans, drained
-1 (15 oz) can black beans
-1 (15 oz) can whole kernel corn (i used 2 cups frozen corn, cooked before adding)
What you do:
Heat the olive oil in a large pot over medium heat. Stir in the onion, and season with bay leaves, cumin, oregano, and salt. Cook and stir until onion is tender, then mix in the celery, green bell peppers, jalapeno peppers, garlic, and green chile peppers. When vegetables are heated through, mix in the vegetarian burger crumbles. Reduce heat to low, cover pot, and simmer 5 minutes. Mix the tomatoes into the pot. Season with chili powder and pepper. Stir in the kidney beans, garbanzo beans, and black beans. Bring to a boil, reduce heat to low, and simmer 45 minutes. Stir in the corn, and continue cooking 5 minutes before serving.
Source: www.allrecipes.com
Sunday, September 23, 2012
Swedish Meatlessballs
My rating for this recipe: ✭✭✩✩✩
Steve's rating for this recipe: ✭✩✩✩✩
Unfortunately they can't all be winners...but it's even more of a letdown when the meal that is less than delicious (in this case a LOT less) takes 2 hours to prepare. With the exception of Thanksgiving or large family dinners, I haven't spent 2 hours preparing a meal since I started cooking! To be fair to the dish, its original author was either a complete moron or was born without taste buds, because the sauce that was included with the meatball recipe was so disgusting, I had to throw it out. I'd already been cooking for over and hour and should have been done, but I had to quickly google another recipe for a new sauce. So this took way longer than it should have. Another issue that's not the fault of the food is that Steve and I came to realize upon trying this one that we are not fans of nutmeg. No no, that's putting it too mildly; we despise nutmeg. Steve said he's going to throw away the remaining nutmeg in the cupboard so that he never has to taste it again. I will of course keep it, since its flavor does not always stand out so much in other dishes as it did in this one. Bleck! Ok, so even though it wasn't a winner in our household, it was still a new recipe we tried so I'm still going to post the recipe. Not just for the sake of blogging, either. If there was nothing appealing about this one, we wouldn't have awarded it any stars at all; but we both liked the consistency of the meatballs, and the flavor seemed like it would've been decent if not for the overpowering nutmeg. I think the texture would have been even better, but I had an issue while making them - the part in the recipe when it says the mixture should be a sticky mass was way off and I had to add quite a lot of bread crumbs and water to get it to the right texture. Regardless, they were a pretty good texture anyway. For someone who really enjoys the flavor of nutmeg, this would probably be a winner. Maybe not so much for us, but the consistency of the meatballs won this dish a star from each of us. I also happened to enjoy the flavor of the sauce I ended up making. It wasn't brilliant or anything, but it was good. So I gave an additional star for that. Once we've recovered from this flop, I'll be trying a vegan Swedish Meatball recipe again in the future - it just may be a while down the road. Here's the recipe.
What you need:
For the sauce:
Combine water, Bragg's, Marmite, spices, sauce and cornstarch in a large pot and bring to bubbling. Whisk flour into soy milk and add to pot. Whisk until smooth and thick.
Heat noodles according to package directions, serve meatballs over noodles with sauce in a gravy boat.
Source for the meatless balls: vegalicious.org
Source for the sauce: VeganDad.blogspot.com
Steve's rating for this recipe: ✭✩✩✩✩
Unfortunately they can't all be winners...but it's even more of a letdown when the meal that is less than delicious (in this case a LOT less) takes 2 hours to prepare. With the exception of Thanksgiving or large family dinners, I haven't spent 2 hours preparing a meal since I started cooking! To be fair to the dish, its original author was either a complete moron or was born without taste buds, because the sauce that was included with the meatball recipe was so disgusting, I had to throw it out. I'd already been cooking for over and hour and should have been done, but I had to quickly google another recipe for a new sauce. So this took way longer than it should have. Another issue that's not the fault of the food is that Steve and I came to realize upon trying this one that we are not fans of nutmeg. No no, that's putting it too mildly; we despise nutmeg. Steve said he's going to throw away the remaining nutmeg in the cupboard so that he never has to taste it again. I will of course keep it, since its flavor does not always stand out so much in other dishes as it did in this one. Bleck! Ok, so even though it wasn't a winner in our household, it was still a new recipe we tried so I'm still going to post the recipe. Not just for the sake of blogging, either. If there was nothing appealing about this one, we wouldn't have awarded it any stars at all; but we both liked the consistency of the meatballs, and the flavor seemed like it would've been decent if not for the overpowering nutmeg. I think the texture would have been even better, but I had an issue while making them - the part in the recipe when it says the mixture should be a sticky mass was way off and I had to add quite a lot of bread crumbs and water to get it to the right texture. Regardless, they were a pretty good texture anyway. For someone who really enjoys the flavor of nutmeg, this would probably be a winner. Maybe not so much for us, but the consistency of the meatballs won this dish a star from each of us. I also happened to enjoy the flavor of the sauce I ended up making. It wasn't brilliant or anything, but it was good. So I gave an additional star for that. Once we've recovered from this flop, I'll be trying a vegan Swedish Meatball recipe again in the future - it just may be a while down the road. Here's the recipe.
What you need:
-1 cup TVP (Texturized Vegetable Protein)
-½ cup breadcrumbs
-1 tbsp soy sauce or tamari
-salt
-1 onion, minced
-1 tbs. nutmeg
-salt and pepper
-250 grams fine noodles
-¼ cup Bragg's, or light soy sauce
-2-3 tsp Marmite (I didn't have this, so I left it out)
-¼ tsp nutmeg
-¼ tsp allspice
-1 tsp onion powder
-1 tsp garlic powder
-2 tbsp vegan worcestershire sauce
-2 tbsp HP sauce (I didn't have this, I used regular BBQ sauce)
-1 tbsp cornstarch
-2-4 tbsp sugar
-½ cup plain soy milk
-3 tbsp flour
What you do:
For the meatless balls:
Soften the TVP flakes using hot water. Add the soy sauce and a pinch of salt. Add teh minced onion, pepper (it doesn't say how much so I used a dash), and mix in the bread crumbs. Season with the nutmeg. The mixture should be a firm sticky mass (it definitely was not). If not, add a bit more bread crumbs or warm water, whichever is needed (a lot of each were needed). Form medium sized balls from the mixture using a tablespoon (make them on the small-ish side). Remove the balls and place them on a platter which is ovenproof and keep them warm in the oven while you make the sauce and noodles.
For the sauce:
Combine water, Bragg's, Marmite, spices, sauce and cornstarch in a large pot and bring to bubbling. Whisk flour into soy milk and add to pot. Whisk until smooth and thick.
Heat noodles according to package directions, serve meatballs over noodles with sauce in a gravy boat.
Source for the meatless balls: vegalicious.org
Source for the sauce: VeganDad.blogspot.com
Wednesday, September 19, 2012
How to Store Fruits & Veggies
I just found this awesome list of tips on how to store your produce in the fridge so it will stay better longer! I know as a veggie head who tries to keep things healthy, I spend a lot of money buying organic fruits & veggies - and if it doesn't get used quickly enough it goes bad. Every time I toss a fuzzy fruit I know I'm throwing my hard earned cash right into that garbage pail. Thanks to MyThirtySpot.com, I might be able to keep more of the green in my fridge (and my wallet!). This list is great, I can't wait to start getting more of my money's worth out of my food!!
Watermelon - Keep watermelon uncut on your counter at room temperature for up to 7 - 10 days. Cut watermelon can keep in the refrigerator for up to two days.
How to Store Vegetables
Always remove any tight bands from your vegetables or at least loosen them to allow them to breathe.
Artichokes ‐ place in an airtight container sealed, with light moisture.
Asparagus ‐ place them loosely in a glass or bowl upright with water at room temperature. (Will keep for a week outside the fridge)
Avocados ‐ place in a paper bag at room temp. To speed up their ripening‐ place an apple in the bag with them.
Arugula ‐ arugula, like lettuce, should not stay wet! Dunk in cold water and spin or lie flat to dry. Place dry arugula in an open container, wrapped with a dry towel to absorb any extra moisture.
Basil ‐ is difficult to store well. Basil does not like the cold, or to be wet for that matter. The best method here is an airtight container/jar loosely packed with a small damp piece of paper inside‐left out on a cool counter.
Beans - shelling‐ open container in the fridge, eat ASAP. Some recommend freezing them if not going to eat right away
Beets ‐ cut the tops off to keep beets firm, (be sure to keep the greens!)by leaving any top on root vegetables draws moisture from the root, making them loose flavor and firmness. Beets should be washed and kept in and open container with a wet towel on top.
Beet greens ‐ place in an airtight container with a little moisture.
Broccoli ‐ place in an open container in the fridge or wrap in a damp towel before placing in the fridge.
Broccoli Rabe ‐ left in an open container in the crisper, but best used as soon as possible.
Brussels Sprouts ‐ If bought on the stalk leave them on that stalk. Put the stalk in the fridge or leave it on a cold place. If they’re bought loose store them in an open container with a damp towel on top.
Cabbage ‐ left out on a cool counter is fine up to a week, in the crisper otherwise. Peel off outer leaves if they start to wilt. Cabbage might begin to lose its moisture after a week, so, best used as soon as possible.
Carrots ‐ cut the tops off to keep them fresh longer. Place them in closed container with plenty of moisture, either wrapped in a damp towel or dunk them in cold water every couple of days if they’re stored that long.
Cauliflower ‐ will last a while in a closed container in the fridge, but they say cauliflower has the best flavor the day it’s bought.
Celery ‐ does best when simply places in a cup or bowl of shallow water on the counter. If you want to keep it in the refrigerator, like I do, wrap it in tin foil. It will stay crisp for weeks.
Celery root/Celeriac ‐ wrap the root in a damp towel and place in the crisper.
Corn‐ leave un-husked in an open container if you must, but corn really is best eaten sooner than later for maximum flavor.
Cucumber ‐ wrapped in a moist towel in the fridge. If you’re planning on eating them within a day or two after buying them they should be fine left out in a cool room.
Eggplant ‐ does fine left out in a cool room. Don’t wash it; eggplant doesn’t like any extra moisture around its leaves. For longer storage‐ place loose, in the crisper.
Fava beans ‐ place in an air tight container.
Fennel ‐ if used within a couple of days after it’s bought, fennel can be left out on the counter, upright in a cup or bowl of water (like celery). If wanting to keep longer than a few days place in the fridge in a closed container with a little water.
Garlic ‐ store in a cool, dark, place.
Green garlic ‐ an airtight container in the fridge or left out for a day or two is fine, best before dried out.
Greens ‐ remove any bands, twist ties, etc. most greens must be kept in an air‐tight container with a damp cloth‐ to keep them from drying out. Kale, collards, and chard even do well in a cup of water on the counter or fridge.
Green beans ‐ they like humidity, but not wetness. A damp cloth draped over an open or loosely closed container.
Green Tomatoes ‐ store in a cool room away from the sun to keep them green and use quickly or they will begin to color.
Herbs - a closed container in the fridge to be kept up to a week. Any longer might encourage mold.
Lettuce ‐ keep damp in an airtight container in the fridge.
Leeks ‐ leave in an open container in the crisper wrapped in a damp cloth or in a shallow cup of water on the counter (just so the very bottom of the stem has water).
Okra ‐ doesn’t like humidity. So a dry towel in an airtight container. Doesn’t store that well, best eaten quickly after purchase
Onion ‐ store in a cool, dark and dry, place‐ good air circulation is best, so don’t stack them.
Mushrooms - Keep mushrooms in the refrigerator in its original wrapping. If you are using some of the mushrooms, try to open a corner of the plastic wrap and just take what you need. Then, cover with a paper towel and cover with more plastic wrap and place back into the refrigerator.
Parsnips ‐ an open container in the crisper, or, like a carrot, wrapped in a damp cloth in the fridge.
Peppers: Sweet/ Hot/ Bell - Store in a plastic bag before placing in crisper or refrigerator. Green peppers stay fresh longer than orange or red peppers. Will last 1 - 2 weeks in refrigerator or up to 10 months in the freezer. To freeze cut into slices and place on cookie sheet in the freezer until frozen, then place in air-tight container or freezer bag and return to freezer.
Potatoes ‐ (like garlic and onions) store in cool, dark and dry place, such as, a box in a dark corner of the pantry; a paper bag also works well.
Radicchio ‐ place in the fridge in an open container with a damp cloth on top.
Radishes ‐ remove the greens (store separately) so they don’t draw out excess moisture from the roots and place them in an open container in the fridge with a wet towel placed on top.
Rhubarb ‐ wrap in a damp towel and place in an open container in the refrigerator.
Rutabagas ‐ in an ideal situation a cool, dark, humid root cellar or a closed container in the crisper to keep their moisture in.
Snap peas ‐ refrigerate in an open container
Spinach ‐ store loose in an open container in the crisper, cool as soon as possible. Spinach loves to stay cold.
Spring onions ‐ Remove any band or tie and place in the crisper.
Sprouts - Keep them cold. Under 40 degrees F'. Get them in the refrigerator as soon as possible and they should last 10 - 14 days.
Summer Squash ‐ does fine for a few days if left out on a cool counter, even after cut.
Sweet peppers ‐ Only wash them right before you plan on eating them as wetness decreases storage time. Store in a cool room to use in a couple of days, place in the crisper if longer storage needed.
Sweet Potatoes ‐ Store in a cool, dark, well‐ventilated place. Never refrigerate‐‐sweet potatoes don’t like the cold.
Tomatoes ‐ Never refrigerate. Depending on ripeness, tomatoes can stay for up to two weeks on the counter. To hasten ripeness place in a paper bag with an apple.
Turnips ‐ remove the greens (store separately) same as radishes and beets, store them in an open container with a moist cloth.
Winter squash ‐ store in a cool, dark, well ventilated place. Many growers say winter squashes get sweeter if they’re stored for a week or so before eaten.
Zucchini ‐ does fine for a few days if left out on a cool counter, even after cut. Wrap in a cloth and refrigerate for longer storage.
How to Store Fruit
Apples ‐ store on a cool counter or shelf for up to two weeks. For longer storage in a cardboard box in the fridge.
Bananas - Take your bananas apart when you get home from the store. If you leave them connected at the stem, they ripen faster. Keep them on the counter, or in a basket with holes or openings to allow air to circulate.Citrus ‐ store in a cool place, with good airflow, never in an air‐tight container.
Apricots ‐ on a cool counter to room temperature or fridge if fully ripe.
Cherries ‐ store in an airtight container. Don’t wash cherries until ready to eat, any added moisture encourages mold.
Berries - Don’t forget, they’re fragile. When storing be careful not to stack too many high, a single layer if possible. A paper bag works well, only wash before you plan on eating them.
Dates ‐ dryer dates (like Deglet Noor) are fine stored out on the counter in a bowl or the paper bag they were bought in. Moist dates (like Medjool) need a bit of refrigeration if they’re going to be stored over a week, either in cloth or a paper bag‐ as long as it’s porous to keeping the moisture away from the skin of the dates.
Figs ‐ Don’t like humidity, so, no closed containers. A paper bag works to absorb excess moisture, but a plate works best in the fridge up to a week un‐stacked.
Grapes - Make sure to select clusters that are free from molds if you plan to keep them in your fridge. Another mistake people make when storing grapes is washing them before storing. While this may clean them and get rid of dirt on them, the water will have a negative effect on the skins of the grapes; making them mushier and promoting bacterial growth in the process.
Kiwi - Keep at room temperature until ripe, then refrigerate. Do not place in refrigerator longer than 1 -2 weeks.
Lemons and Limes - If you are going to use them within a week, keep them on the counter at room temperature. Lemons and limes need air so if you place them in a bowl, you may notice their bottoms may grow mold. Try to keep them separated or in an aerated bowl. If you don't eat them within a week, you can keep them in the refrigerator and they will last a month. You can keep them in a bowl in the refrigerator.
Mangoes - Store on the counter until ripe or 2 - 5 days, then move to refrigerator, then keep for 5 - 7 days. If you want to freeze wash peel and slice into pieces. Place pieces on a cookie sheet until frozen then you can transfer to plastic bag.
Melons ‐ uncut in a cool dry place, out of the sun up to a couple weeks. Cut melons should be in the fridge, an open container is fine.
Nectarines ‐ (similar to apricots) store in the fridge it is okay if it's ripe, but best taken out a day or two before you plan on eating them so they soften to room temperature.
Peaches - (and most stone fruit) ‐ refrigerate only when fully ripe. More firm fruit will ripen on the counter.
Pears ‐ will keep for a few weeks on a cool counter, but fine in a paper bag. To hasten the ripening put an apple in with them.
Oranges - stay juicier when kept at room temperature. If possible place in a basket. The baskets are preferable to other containers because they permit the air to circulate freely around each piece of fruit.
Persimmon - Fuyu‐ (shorter/pumpkin shaped): store at room temperature.
Hachiya - (longer/pointed end): room temperature until completely mushy. The astringentness of them only subsides when they are completely ripe. To hasten the ripening process place in a paper bag with a few apples for a week, check now and then, but don’t stack‐they get very fragile when really ripe.
Plums - Keep plums at room temperature until they ripen. Once they're ripe, keep in the refrigerator for up to 5 more days.
Pomegranates ‐ keep up to a month stored on a cool counter.
Raspberries - Wash your berries in a vinegar solution of 1 part vinegar to 3 parts water. Place berries in a refrigerator safe bowl (plastic) with a paper towel on the bottom. Replace paper towel when it gets damp.
Strawberries ‐ Don’t like to be wet. Do best in a paper bag in the fridge for up to a week. Check the bag for moisture every other day.
Tuesday, September 18, 2012
Udon Noodles with Sesame Crusted Tofu
My rating for this recipe: ✭✭✭✭✩
Steve's rating for this recipe: ✭✭✭✩✩
As promised, I am posting a new recipe Steve & I tried tonight. Unfortunately we didn't take any photos, since I was too preoccupied with my fear of the local weather conditions to remember to snap a shot of our meal, but I will tell you that if I had, you would've seen one empty plate alongside one not-so-empty plate. I loved this dish, and Steve wasn't as crazy about it as I was. He really liked the way the tofu came out and the flavor of the sauce, but as it turns out he's not a huge fan of wonderfully thick yummy noodles. I happen to LOVE udon noodles, so this dish was definitely a winner for me. It would've gotten a full 5 stars, but I wish the tofu had been crispier. Could've been that I didn't fry it long enough, but the directions said it should be golden on all sides, so once it was I stopped! Maybe next time I'll fry it for longer and it'll be a 5 star kind of plate. If we make it again, I'll be sure to include a pic or 2. Ok, so here's the recipe:
What you need:
- udon noodles (we used 2 packages)
- 1 pkg tofu, cubed (we used extra firm)
- ⅓ cup sesame seeds
- 2 tbsp cornstarch
- oil for frying
- 1 small red pepper, thinly sliced
- 1 small orange pepper, thinly sliced
- 1" piece of ginger, minced (we used ground, the equiv is ⅛ TBSP)
- 1 garlic clove, minced
- ¼ cup rice vinegar
- 2 tbsp soy sauce
- 2 tbsp hoisin sauce
- 4 green onions, thinly sliced
What you do:
1. Cook noodles according to the directions on the package.
2. Place tofu in a bowl and add sesame seeds. Toss until most of the seeds are stuck on the tofu (you don't need full coverage here). Add cornstarch and gently toss until tofu is coated. If you still have some seeds in the bottom of the bowl, dump the tofu out on a cookie sheet and roll the cubes in the excess seeds.
3. Fry tofu in some oil over medium heat until nicely golden. Turn regularly to brown all sides. You don't need a lot of oil here. Start with a relatively thin layer and add more as needed. Remove tofu from pan/wok and drain.
4. Add peppers, ginger and garlic to the pan (there should be just a bit of oil left) and stir fry for 3-4 mins, until softened and fragrant. Add noodles to the pan/wok and fry for a min.
5. Add vinegar, soy sauce, and hoisin sauce and mix well. Add tofu and mix well. Cook until sauce thickens/soaks into the noodles. Adjust flavours/wetness to your liking by adding more of any of the three ingredients.
6. Remove from heat. Garnish with green onions. Serve.
Saturday, September 15, 2012
Back to Blogging...Justin Time!
I wrote a (now deleted) blog post a few months ago saying I would be blogging again...but with being new parents we were kind of in a food rut, making the same old things all the time. Oh yeah that's right, I became a mom since the time of my last blog!! Welcome to the world, my sweet little Justin - we'll be raising him vegetarian, with a limited amount of dairy. So we'll still be making plenty of yummy vegan delights!!!
So since we've got the parenting thing down a little bit better, we have a little more time to spend on cooking - and blogging! And now that our little man is eating solids we realized we'd better step up our game with what we're putting in our own bodies, since it won't be long before he'll be joining us at the table!
I've been a Pinterest addict lately, finding tons of awesome-looking new recipes. We're going to do our best to get back on track with trying one new recipe a week and posting it on here. Here's hoping we're not all talk this time! :) One new recipe coming up within the next few days (i hope!!)...
Subscribe to:
Posts (Atom)